ಅನ್ವಯವಾಗದ ಹಾರ್ಡ್ವೇರ್ ಆಳವನ್ನು ಸರಿಪಡಿಸಿ
ಹಾರ್ಡ್ವೇರ್ ನಮೂದಿನಲ್ಲಿ ಆಳವನ್ನು ಬದಲಿಸಿ, ಮರುಲೋಡ್ ಮಾಡಿ ಮತ್ತೆ ಸೇರಿಸಿ, ನಂತರವೂ ಅನ್ವಯವಾಗದಿದ್ದರೆ drawer ಮಟ್ಟದ ಸೆಟ್ಟಿಂಗ್ ಪರಿಶೀಲಿಸಿ.
ಹಾರ್ಡ್ವೇರ್ ಆಳವನ್ನು ಹಾರ್ಡ್ವೇರ್ ನಮೂದಿನ Edit SKU Properties ಫಾರ್ಮ್ನಿಂದ ಬದಲಿಸಲಾಗುತ್ತದೆ: Additional Properties ವಿಸ್ತರಿಸಿ, ಆಳದ ಮೌಲ್ಯವನ್ನು ಸರಿಹೊಂದಿಸಿ Update Details ನಿಂದ ಉಳಿಸಿ, ನಂತರ ಮರುಲೋಡ್ ಮಾಡಿ ಹಾರ್ಡ್ವೇರ್ ಅನ್ನು ಮತ್ತೆ ಸೇರಿಸಿ.
✓ ಅಕ್ಟೋಬರ್ 21, 2026 ರಂದು ಪ್ರಾಡಕ್ಟ್ನಲ್ಲಿ ಪರಿಶೀಲಿಸಲಾಗಿದೆ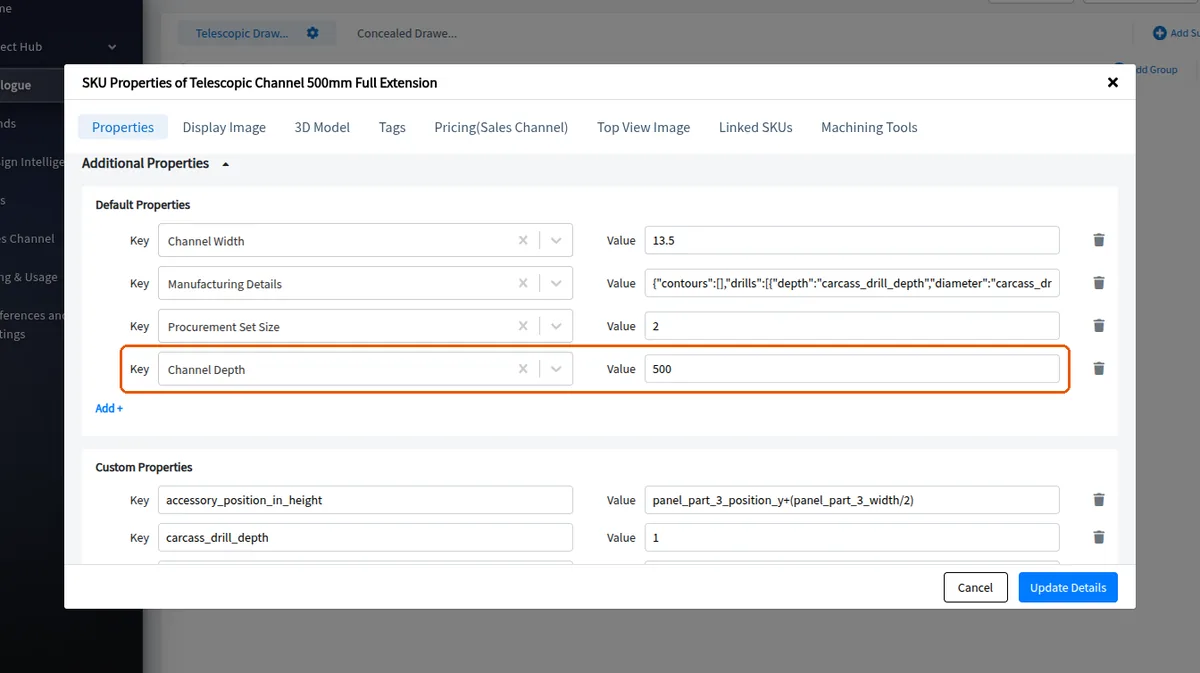
ಸ್ಕ್ರೀನ್ಶಾಟ್ಗಳಲ್ಲಿ ಪ್ರಾಡಕ್ಟ್ ಇಂಗ್ಲಿಷ್ನಲ್ಲಿ ತೋರಿಸಲಾಗಿದೆ. ಹೊಸ ಆಳವು ಇನ್ನೂ ಅನ್ವಯವಾಗದಿದ್ದರೆ, ಬದಲಿಗೆ drawer level ನಲ್ಲಿ ಆಳದ ಸೆಟ್ಟಿಂಗ್ ಪರಿಶೀಲಿಸಿ.
In the bulk edit of several selected SKUs, the board sizes section has a "Mode:" that reads either "Add or delete sizes" or "Replace all sizes".
To add or delete sizes: in "Add or delete sizes" mode, enter each size under "Length (mm) × Width (mm)" using the "Length in mm" and "Width in mm" fields. The "Adds To" column tells you how many selected SKUs will get that size. To drop a size, use "Remove row". A summary shows what is "Adding:" and what is "Deleting:".
To replace all sizes on the selected SKUs with the same list: switch to "Replace all sizes" and enter the list of sizes; every selected SKU ends up with exactly those sizes. The list cannot be empty in this mode.
Length and width must be whole numbers above 0. A size already in the list, or one also marked for deletion, is flagged; a size every selected SKU already has is only a warning.